
Kitbot Additional Motors
Remaining Motors
Section titled “Remaining Motors”The kitbot has two additional motors that allow it to intake and shoot fuel.
The IntakeLauncher motor powers the intake roller and the launcher flywheel.
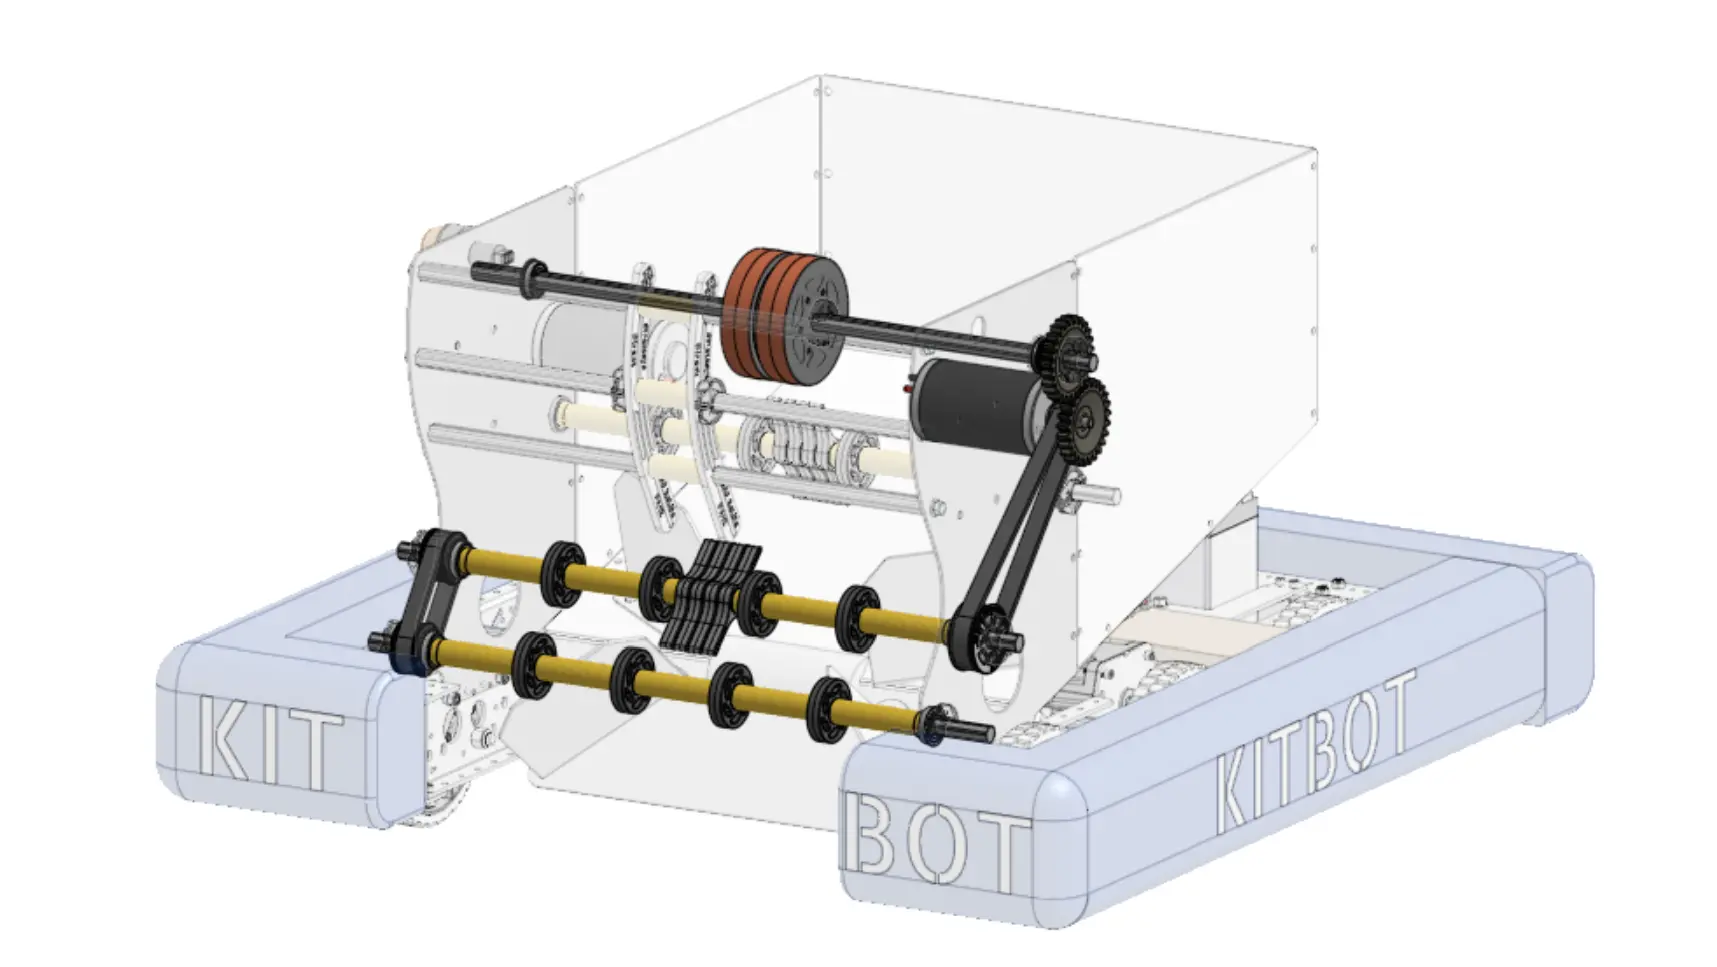
The Feeder motor feeds fuel into the hopper, into the launcher, or out of the intake depending on the direction it spins.
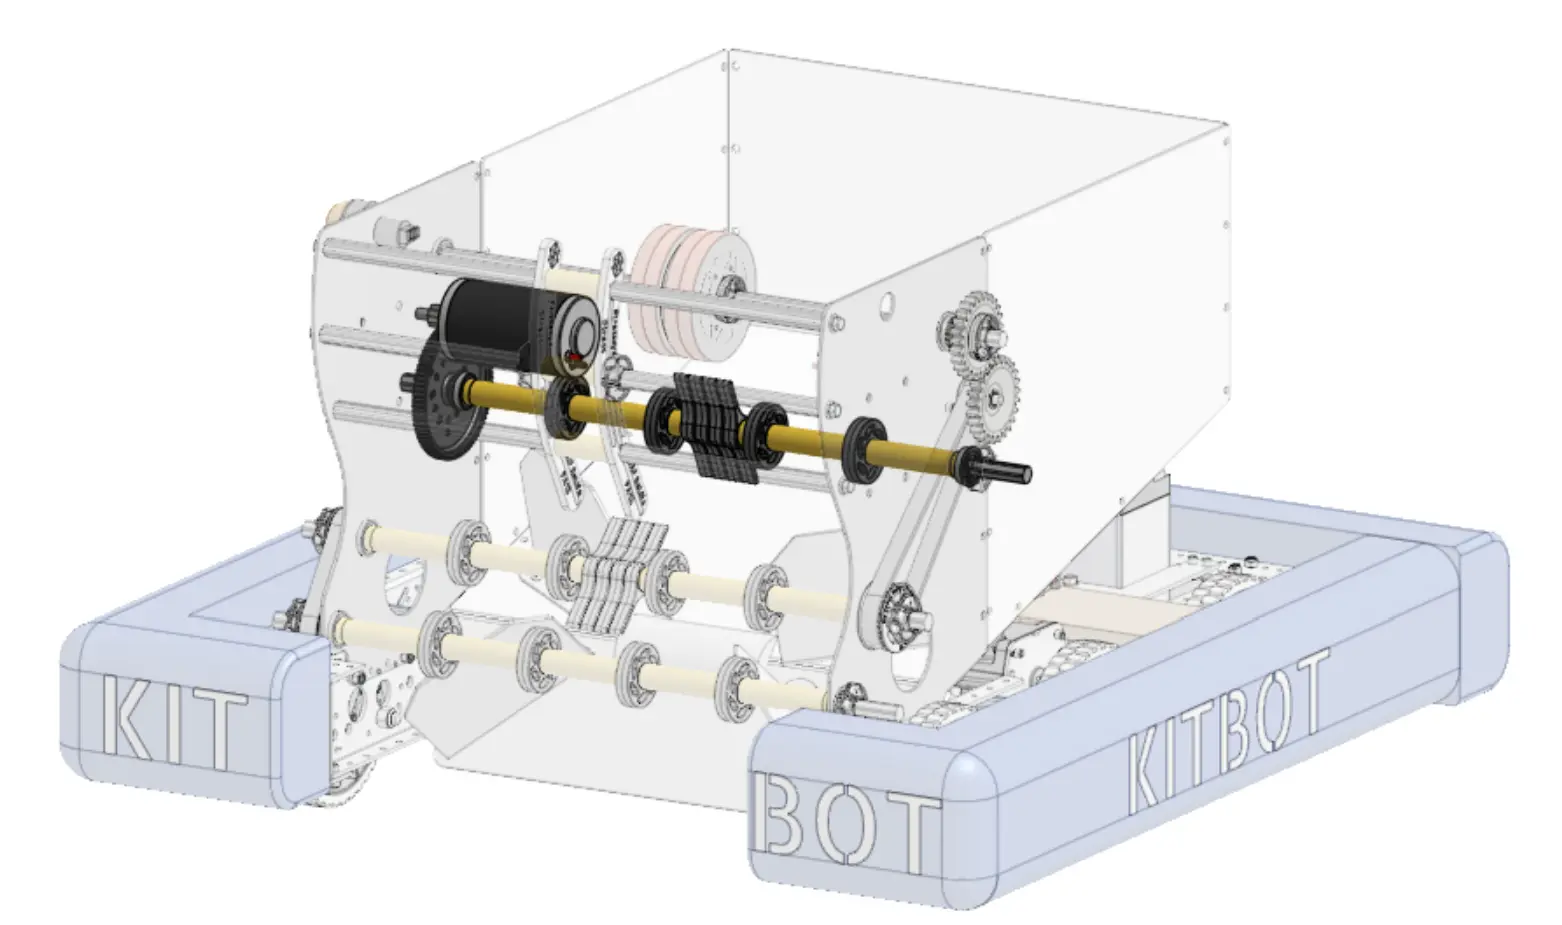
The IntakeLauncher motor will be on CAN Bus 0 with a CAN Id of 4 while the Feeder motor will be on CAN Bus 0 with a CAN Id of 5.
Inside of the Robot.java file create a motor controller instance for the IntakeLauncher and Feeder motors.
public TalonFX intakeLauncher = new TalonFX(4, CANBus.systemcore(0));public TalonFX feeder = new TalonFX(5, CANBus.systemcore(0));public SparkMax intakeLauncher = new SparkMax(0, 4, MotorType.kBrushless);public SparkMax feeder = new SparkMax(0, 5, MotorType.kBrushless);Simulating Additional Motors
Section titled “Simulating Additional Motors”Like the drivetrain, the SingleFlywheelSim class is provided which abstracts much of the simulation code.
The SingleFlywheelSim has different static methods for the LauncherFeeder and Intake motors which return instances of SingleFlywheelSim with settings for those specific motors.
Creating the SingleFlywheelSim instance for the LauncherFeeder motor will look like this
private SingleFlywheelSim intakeLauncherSim = SingleFlywheelSim.forIntakeLauncher(intakeLauncher);private SingleFlywheelSim intakeLauncherSim = SingleFlywheelSim.forIntakeLauncher(intakeLauncher);Now try creating the SingleFlywheelSim instance for the Intake motor.
This will instead use the forFeeder() method.
Solution
private SingleFlywheelSim feederSim = SingleFlywheelSim.forFeeder(feeder);private SingleFlywheelSim feederSim = SingleFlywheelSim.forFeeder(feeder);To make the simulated motor controllers update, the SingleFlywheelSim instances’ periodic() functions need to be called inside of simulationPeriodic().
intakeLauncherSim.periodic();feederSim.periodic();feederSim.periodic();Fuel Sim
Section titled “Fuel Sim”If the code was to be simulated at this point, the motors could be controlled using keyboard inputs and the resulting motor speeds could be viewed with a graph inside of AdvantageScope.
While this is a functional solution, it can be made more interesting by taking advantage of AdvantageScope’s 3d tab.
AdvantageScope’s 3d tab displays robots and game pieces inside of a game field using data published from the robot code.
The FuelSim class provides simulation data for fuel game pieces to be visualized entering and exiting the robot.
References to the IntakeLauncher and Feeder motors are given to the FuelSim class when the SingleFlywheelSim instances are created.
To make the FuelSim class function, its periodic() function needs to be called inside of simulationPeriodic().
FuelSim.periodic();FuelSim.periodic();Check Up
Section titled “Check Up”The Robot class is now completed!
At this point your Robot class should look like this
Robot Solution
/** * The methods in this class are called automatically as described in the OpModeRobot documentation. * OpMode classes anywhere in the package (or sub-packages) where this class is located are * automatically registered to display in the Driver Station. If you change the name of this class * or the package after creating this project, you must also update the Main.java file in the * project. */public class Robot extends OpModeRobot {
  private final int leftLeaderID = 0;  public TalonFX leftLeader = new TalonFX(leftLeaderID, CANBus.systemcore(0));  private TalonFX leftFollower = new TalonFX(1, CANBus.systemcore(0));
  private final int rightLeaderID = 2;  public TalonFX rightLeader = new TalonFX(rightLeaderID, CANBus.systemcore(0));  private TalonFX rightFollower = new TalonFX(3, CANBus.systemcore(0));
  public final DifferentialDrive drivetrain =      new DifferentialDrive(leftLeader::setThrottle, rightLeader::setThrottle);
  private OnboardIMU imu = new OnboardIMU(MountOrientation.FLAT);
  private DrivetrainSim drivetrainSim = new DrivetrainSim(leftLeader, rightLeader);
  public TalonFX intakeLauncher = new TalonFX(4, CANBus.systemcore(0));  public TalonFX feeder = new TalonFX(5, CANBus.systemcore(0));
  private SingleFlywheelSim intakeLauncherSim = SingleFlywheelSim.forIntakeLauncher(intakeLauncher);  private SingleFlywheelSim feederSim = SingleFlywheelSim.forFeeder(feeder);

  /**   * This function is run when the robot is first started up and should be used for any   * initialization code.   */  public Robot() {    var leftConfig = new TalonFXConfiguration();    leftConfig.MotorOutput.withInverted(InvertedValue.Clockwise_Positive);    leftLeader.getConfigurator().apply(leftConfig);    leftFollower.getConfigurator().apply(leftConfig);
    leftFollower.setControl(new Follower(leftLeaderID, MotorAlignmentValue.Aligned));
    var rightConfig = new TalonFXConfiguration();    rightConfig.MotorOutput.withInverted(InvertedValue.CounterClockwise_Positive);    rightLeader.getConfigurator().apply(rightConfig);    rightFollower.getConfigurator().apply(rightConfig);
    rightFollower.setControl(new Follower(rightLeaderID, MotorAlignmentValue.Aligned));  }

  @Override  public void simulationPeriodic() {    drivetrainSim.periodic();    intakeLauncherSim.periodic();    feederSim.periodic();
    FuelSim.periodic();  }
/** * The methods in this class are called automatically as described in the OpModeRobot documentation. * OpMode classes anywhere in the package (or sub-packages) where this class is located are * automatically registered to display in the Driver Station. If you change the name of this class * or the package after creating this project, you must also update the Main.java file in the * project. */public class Robot extends OpModeRobot {
private SparkMax leftLeader = new SparkMax(0, 0, MotorType.kBrushless); private SparkMax leftFollower = new SparkMax(0, 1, MotorType.kBrushless); private SparkMax rightLeader = new SparkMax(0, 2, MotorType.kBrushless); private SparkMax rightFollower = new SparkMax(0, 3, MotorType.kBrushless);
public final DifferentialDrive drivetrain = new DifferentialDrive(leftLeader::setThrottle, rightLeader::setThrottle);
private OnboardIMU imu = new OnboardIMU(MountOrientation.FLAT);
private DrivetrainSim drivetrainSim = new DrivetrainSim(leftLeader, rightLeader);
public SparkMax intakeLauncher = new SparkMax(0, 4, MotorType.kBrushless); public SparkMax feeder = new SparkMax(0, 5, MotorType.kBrushless);
private SingleFlywheelSim intakeLauncherSim = SingleFlywheelSim.forIntakeLauncher(intakeLauncher); private SingleFlywheelSim feederSim = SingleFlywheelSim.forFeeder(feeder);
/** * This function is run when the robot is first started up and should be used for any * initialization code. */ public Robot() { var leftConfig = new SparkMaxConfig(); leftConfig.inverted(true); leftLeader.configure( leftConfig, ResetMode.kResetSafeParameters, PersistMode.kPersistParameters); leftFollower.configure( leftConfig.follow(leftLeader), ResetMode.kResetSafeParameters, PersistMode.kPersistParameters);
var rightConfig = new SparkMaxConfig(); rightConfig.inverted(false); rightLeader.configure( rightConfig, ResetMode.kResetSafeParameters, PersistMode.kPersistParameters); rightFollower.configure( rightConfig.follow(rightLeader), ResetMode.kResetSafeParameters, PersistMode.kPersistParameters); }
@Override public void simulationPeriodic() { drivetrainSim.periodic(); intakeLauncherSim.periodic(); feederSim.periodic();
FuelSim.periodic(); }}Additional Motors in Teleop
Section titled “Additional Motors in Teleop”To control the new motors, the motors need to be commanded inside of the MyTeleop OpMode’s periodic() function.
When the controller’s right bumper is pressed, the IntakeLauncher motor should have a throttle of 0.9 while the Feeder motor should have a throttle of 0.75.
This will launch the fuel.
if (xboxController.getRightBumperButton()) { // launch robot.intakeLauncher.setThrottle(0.9); robot.feeder.setThrottle(0.75);if (xboxController.getRightBumperButton()) { // launch robot.intakeLauncher.setThrottle(0.9); robot.feeder.setThrottle(0.75);When the controller’s left bumper is pressed the IntakeLauncher motor should have a throttle of 0.8 while the Feeder motor should have a throttle of -1.0. This will intake the fuel.
} else if (xboxController.getLeftBumperButton()) { // intake robot.intakeLauncher.setThrottle(0.8); robot.feeder.setThrottle(-1.0);} else if (xboxController.getLeftBumperButton()) { // intake robot.intakeLauncher.setThrottle(0.8); robot.feeder.setThrottle(-1.0);When the controller’s A button is pressed the IntakeLauncher motor should have a throttle of -0.8 while the Feeder motor should have a throttle of 1.0. This will outake the fuel.
} else if (xboxController.getAButton()) { // outake robot.intakeLauncher.setThrottle(-0.8); robot.feeder.setThrottle(1.0);} else if (xboxController.getAButton()) { // outtake robot.intakeLauncher.setThrottle(-0.8); robot.feeder.setThrottle(1.0);When none of the previous button are pressed the IntakeLauncher should have a throttle of 0.0 while the Feeder motor should have a throttle of 0.0. This will stop the motors.
} else { // stop robot.intakeLauncher.setThrottle(0.0); robot.feeder.setThrottle(0.0);}} else { // stop robot.intakeLauncher.setThrottle(0.0); robot.feeder.setThrottle(0.0);}Line Graph
Section titled “Line Graph”The process for testing the new motors in teleop is very similar to the process used to test the drivetrain. Holding the “E” key will cause the robot to intake, “Q” will cause the robot to launch. and “R” will cause the robot to outake. Instead of looking at the 2D Field tab in Advantage Scope, use the Line Graph tab to view data from the motors. The voltage applied from the motor controllers to their motors can be viewed on the left axis while the right axis shows the motors’ velocities.
Video showing line 2d graph running goes here.
The 3D Field tab will show a 3D rendering of the kitbot, fuel, and game field. As the robot preforms different actions the fuel should appear or disappear to show these actions. You should also still be able to move using the WASD keys.
Additional Practice
Section titled “Additional Practice”Try improving upon previously created autos by adding robot actions to them.